DIY Shoe Storage for Your Favourite Kicks

DIY Shoe Storage for Your Favourite Kicks
They say that for someone with a sweet tooth, they have a second stomach just for dessert. So for a shoe lover, you ought to make sure you have enough storage space for all of your beloved shoes!
Finding the perfect shoe rack for your unique collection might not be easy, so we’ve put together two bold shoe storage options which you can make at home yourself.
With these two DIY shoe racks, you can show off your favourite kicks with style, while enjoying the convenience and functionality of a well-structured piece of furniture.
Lazy Susan

Photo Credit: How To Instructions
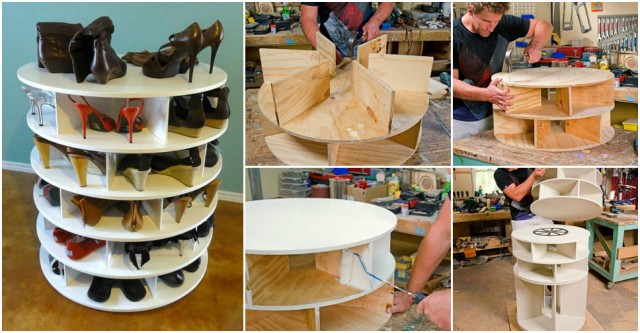
A lazy Susan shoe rack (a lazy ‘shoe’-san, if you will), is based on the same concept as the original lazy Susan found in kitchens, dining rooms and restaurants. The major differences are the size, proportions and number of levels – which you can alter as per your shoe needs.
For the seasoned wood-worker, this will be a breeze. And for those just getting into it, this will be extremely rewarding once you prove your capabilities to yourself.
So here is what you need:

Photo Credit: Amazing Interior Design
|
The basic process:
Using glue and nails, place your dividers on each disc. Create a base, and in between the levels being stacked on top of each other, insert the turntable swivel mechanisms and screws to connect everything.
The full process:
Remember, this is just the fundamental model and you can customise it with your own flair, according to your shoe collection, décor and tastes.
Watch this video for more details: Great Indoor Ideas
Shoe Ladder

Photo Credit: Contemporist
If the lazy Susan is a bit too complex for a beginner, the shoe ladder is the simple route to having a good-looking and easy-to-make shoe rack.
All you need is:
- A ladder
- Pinewood planks (as many as the rungs of the ladder)
- L-brackets
- Screws
- Drill
Depending on the size of the ladder you use, the width of the shelves will differ. The length of each shelf will also be different, decreasing incrementally as you go up. You can change the lengths according to your ladder size and how much space you have, too.
For example, the lengths of the planks could be:
- 1 x 60cm (top)
- 1 x 80cm
- 1 x 1m
- 2 x 1.2m (bottom)
The process:
Step 1: Place your ladder where you want to eventually have your shelf to gauge the amount of space you have to work with and the shelf lengths.
Step 2: Slide the shelf planks onto their respective rungs and measure each end to make sure they are equal and, therefore, in the centre.
Step 3: Once you’ve got the correct placement of each shelf, place the L-bracket so that one side is on the rung and the other side is on the underside of the shelf. Drill 2 L-brackets in place like this for each rung (making it 4 L-brackets for each shelf).
And there you have it! Place your shoes inside and marvel at your handiwork.
Just like your new shoe rack, Cat shoes are also all about blurring the lines between work and play, and between functionality and style. Get some new, trendy shoes for your new shoe rack from Cat Footwear.


